Building a DMZ in a Proxmox Homelab with Palo Alto
I built a dmz in proxmox using Palo Alto.
This blog post goes into how I set up a Palo Alto virtual machine on a proxmox virtualization server and seperated my networks into trust, untrust, and dmz zones.
The main focus will be the the DMZ zone so I will briefly explain what the DMZ is and why it is so important.
Most servers you interact with are in a DMZ zone meaning they are publically accessible to you from almost anywhere. The DMZ that most people are familiar with is the North Korean DMZ which is of course a middle ground between the two countries. It is heavily monitored and nothing gets in or out without permission. This is the best analogy for DMZs in a networking context I could think of without going into too much detail.
A DMZ (Demilitarized Zone) is a secure, isolated subnetwork that acts as a buffer between your organization’s internal, trusted and untrusted networks. A untrusted network is shared academic network or the internet. As far as the security implications for servers NOT in a dmz most of the damage is NOT the server itself but instead the servers behind them. Putting your public facing servers in a DMZ (which is your exposed zone) is a great way to protect your internal assets from attackers.
There are two primary ways organizations build out a DMZ.
The first approach is with a single firewall with three network interfaces (External, Internal, and DMZ). The firewall evaluates and filters traffic between all three networks. In Palo Alto these are labelled as Untrust, Trust, and DMZ.
The second approach is a more defense in depth approach using two firewalls instead of one. The first firewall sits between the internet and the DMZ, and the second sits between the DMZ and the internal network. This requires an attacker to breach two separate security appliances to reach the internal network.
The issue with this second approach for businesses is the cost for the second firewall and of course any network latency caused by the filtering and processing of network traffic. If the risk warrants the extra defense than it becomes a viable option.
This blog shows how I implemented the first approach using a single palo alto virtual machine. This will likely be the first in my blog posts as I am going to expand upon and keep building out this lab network.
To start off I will say I will show the problems I encountered along the way and how I overcame them to achieve my goal. I already had proxmox installed so I will not go over how to do that. My first step was to get the Palo Alto VM file to install. This is where I ran into my first issue.
OVA is not an Image File
Palo Alto ships the VM-Series as an OVA for ESXi, and it’s tempting to treat it like an installer but since Proxmox does not work with OVAs I had to work some magic. I learned that an OVA file is just a tar archive holding an OVF hardware descriptor and one or more VMDK disk images. There’s no convert OVA to ISO step to go looking for — what I wanted was the disk inside it. And I needed to somehow convert this disk to qcow format.
If you have palo alto support-portal access, you can skip the OVA entirely and grab Palo Alto’s native KVM image (PA-VM-KVM-<version>.qcow2) but if all you’ve got is the ESXi OVA, which is what had, I learned I could just extract the disk using the tar command and then use the qemu-img command to convert the vmdk to the qcow2 format.

 A qcow2 file is just the storage format for virtualization software like QEMU/KVM. This problem was now solved and I learned the differences between the different virtualization file formats along the way.
Creating the VM
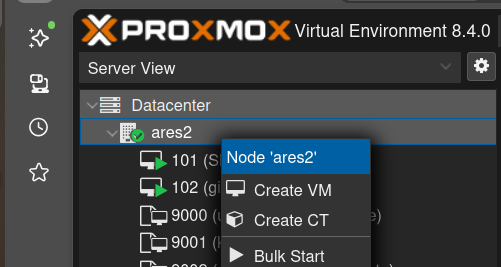
For this next step I created the VM from the GUI (right-clicking the node → Create VM) and I was able to configure it.
A few settings during setup mattered more than the defaults suggested:
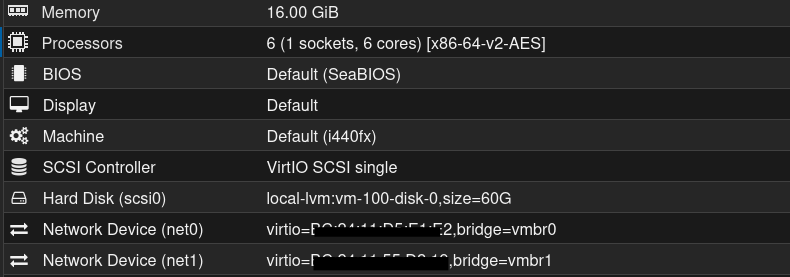
- CPU: 6 cores. Important because Palo Alto’s dataplane gets heavy so I made sure to give it plenty of CPU cores.
- Memory: 16 GB. Important becuase PAN-OS 11 raised the baseline to roughly 9 GB minimum, and under-provisioning lets the management plane boot but the dataplane quietly fails — which looks exactly like a broken firewall so giving it under 9gb of memory is not good. To be safe I gave it 16gb of memory.
- First NIC is a management interface only This is important to know becuase PAN-OS always claims the first NIC as its mgmt interface, so I ordered every NIC around that fact from the start. I started with two NICs but then added a third one later on.
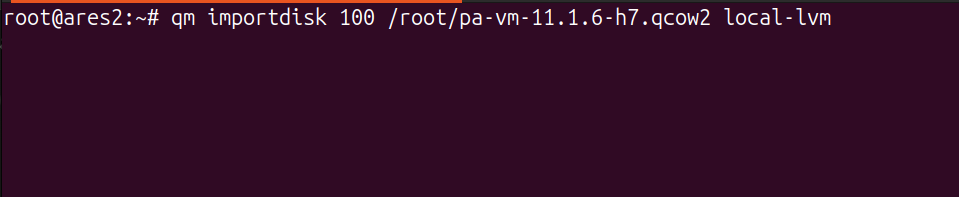
With the shell configured and no disk attached, I imported the converted qcow2 onto the VM via the command line because I found the method in the GUI to not be sufficient.
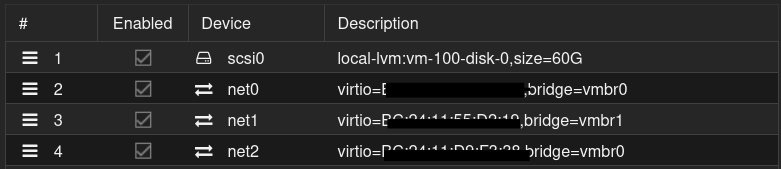
Once I had it imported, the VM hardware showed the disk alongside the vNICs, each bridged to the segment it belongs to.
Now it was time to boot it up!
Boot Time
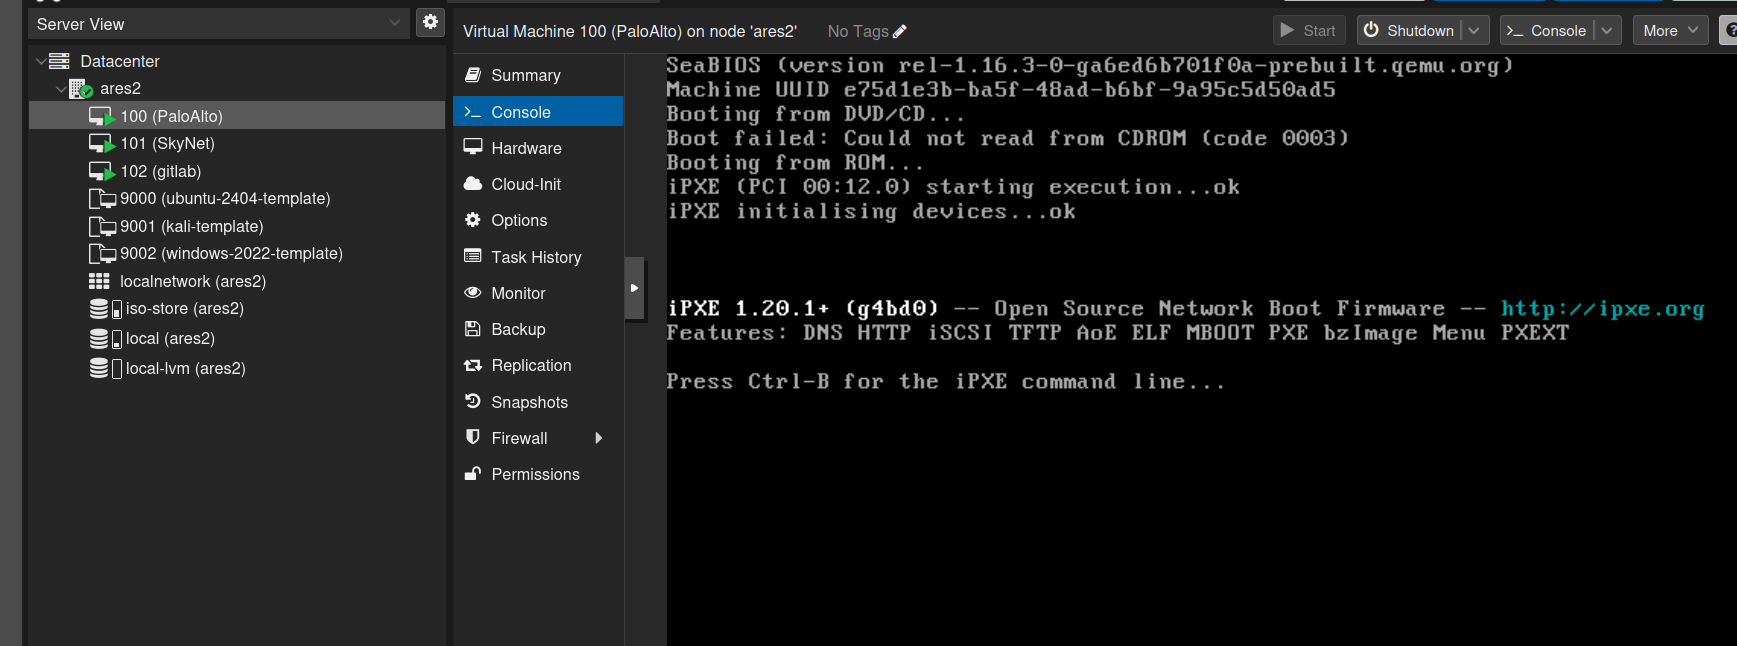
Upon first boot I got the error screen below and I soon found out the problem was I did not set the boot order properly meaning the network tried to boot before the disk.
With a real disk first in line, the BIOS handed off to the PAN-OS bootloader instead of the network and I was able to get in. The correct boot order which I used to fix it is below (note I added a third network interface for the trust zone).
The firewall was then able to boot but the way Palo Alto has it set up is you need to assign it a management zone IP address to get GUI access so after changing the default password I disabled DHCP and set a static address for the management interface. I also added in my upstream NAT address as my DNS so network traffic could flow.
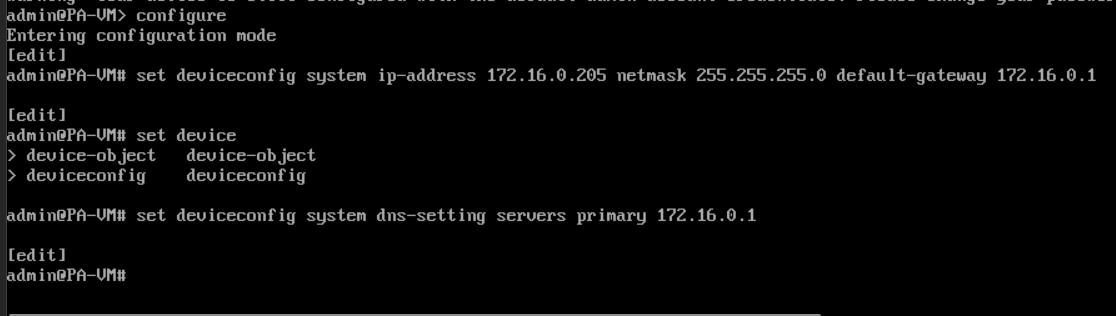
A mistake I made was forgetting to commit the above config so when I went to check to see if the IP was changed it showed the old DHCP assigned one. Note you also have to specify the system device config as static.
After that I was able to go into my web browser and access the GUI and login with my new credentials. This already felt like a huge accomplishment but the work and learning was far from over.
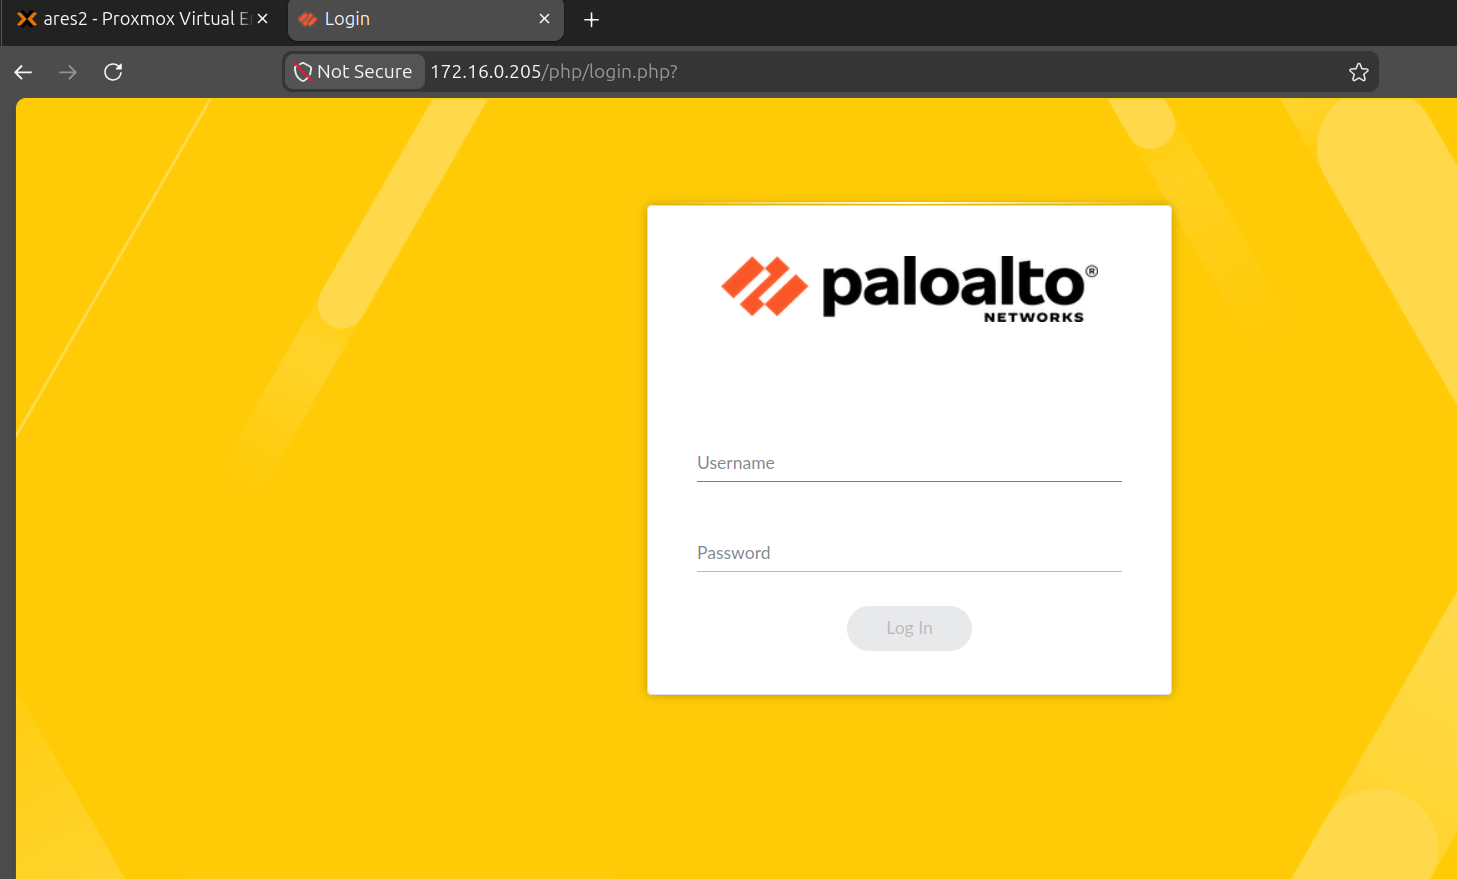
At this point I had my firewall up running with GUI (graphical user interface) access. I should note that Palo Alto keeps the management IP address on its own separate virtual network interface card so in order to add in the trust and dmz sub-networks I would need two more cards (but luckily I knew this already and already attached them). The one thing I did not mention yet is there are all linux bridged. Conceptually, a Linux bridge behaves just like an unmanaged physical hardware switch.
The three-zone design
A DMZ only matters when it sits next to a trusted zone. After all, the entire security architecture relies on isolating an untrusted network from a trusted one. To visualize how these boundaries interact, here is a high-level diagram of the setup.
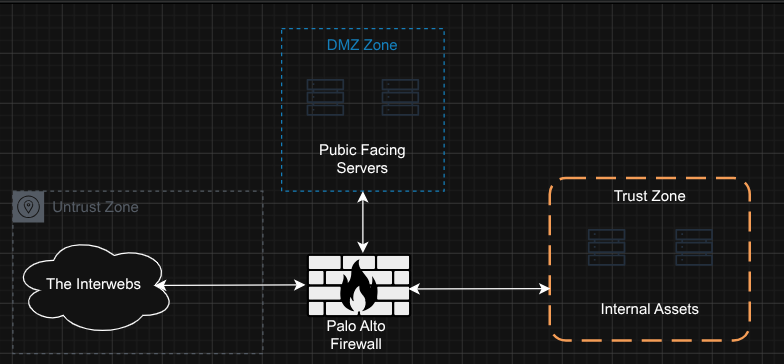
Now how do we make this a reality in Palo Alto?
The first step is to make the interfaces within Palo Alto. Note that each ethernet corresponds to a vNIC we attached to the VM in Proxmox.
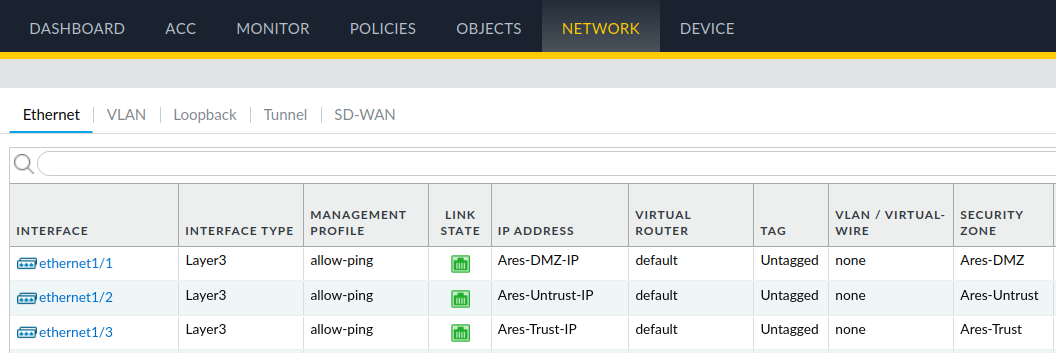
Here is how the Proxmox vNICs map to the Palo Alto interfaces:
- vNIC 0 maps to the Palo Alto Management interface.
- vNIC 1 maps to ethernet 1.
- vNIC 2 maps to ethernet 2.
- vNIC 3 maps to ethernet 3.
Note that vNIC 0 (Management) and vNIC 2 are both assigned to the same Linux bridge in Proxmox. This highlights a useful feature: Proxmox allows you to attach the same virtual bridge to multiple vNICs on a single VM.
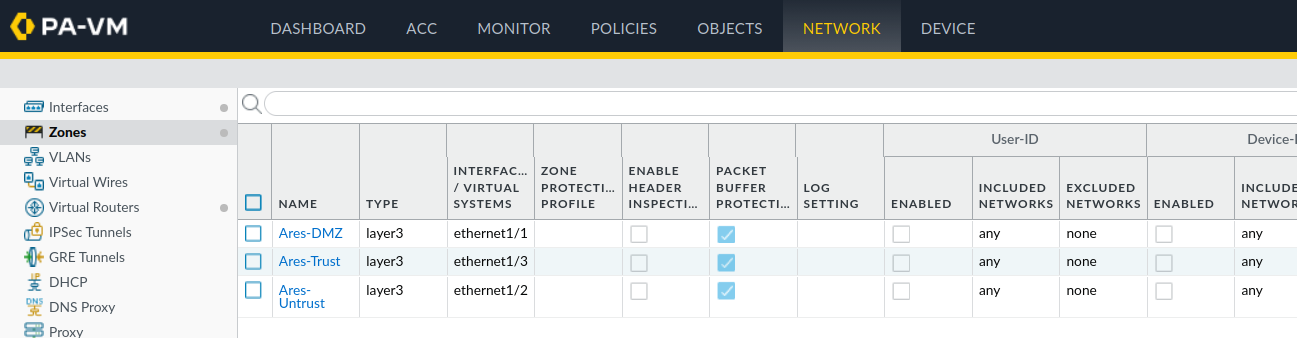
Every ethernet interface gets the same treatment during config which is: set to Layer3, assigned to the same virtual router, and dropped into a security zone. By default everything is blocked so for testing purposes I allowed ping through for all of them.
The seperate security zones I made for the interfaces are below.
Interfaces and zones alone do not get anything online, though. The virtual router needs a default route out of the untrusted interface, so anything it can’t resolve locally heads upstream. So I made a static NAT route for it.
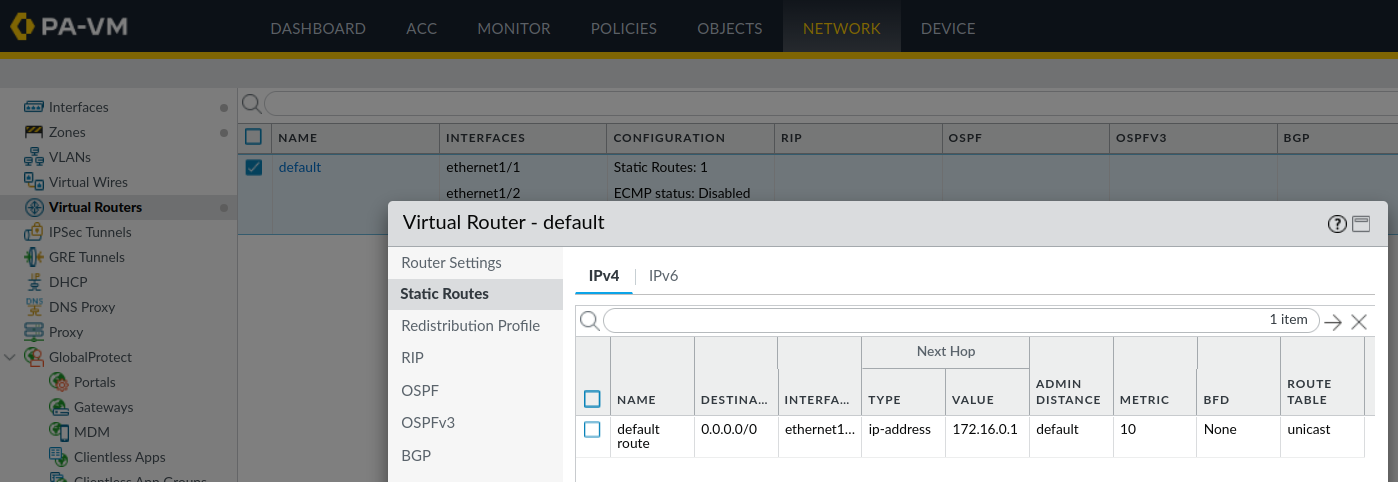
And the two internal segments — DMZ and trust — each also needed a way to translate out the untrust interface so I assigned them the same static route.
Now that everything routes we are good right? NO. Why? Because routing isn’t being enforced.. Traffic flows, but nothing yet decides which traffic is allowed. That decision is the entire reason the firewall is here. So that leads me to the security policy step.
The security policy
Because PAN-OS is default-deny, network segmentation lives in your firewall rules, not your wiring or routing. It works like a chain of command: traffic is evaluated from top to bottom, and the very first rule that matches wins.
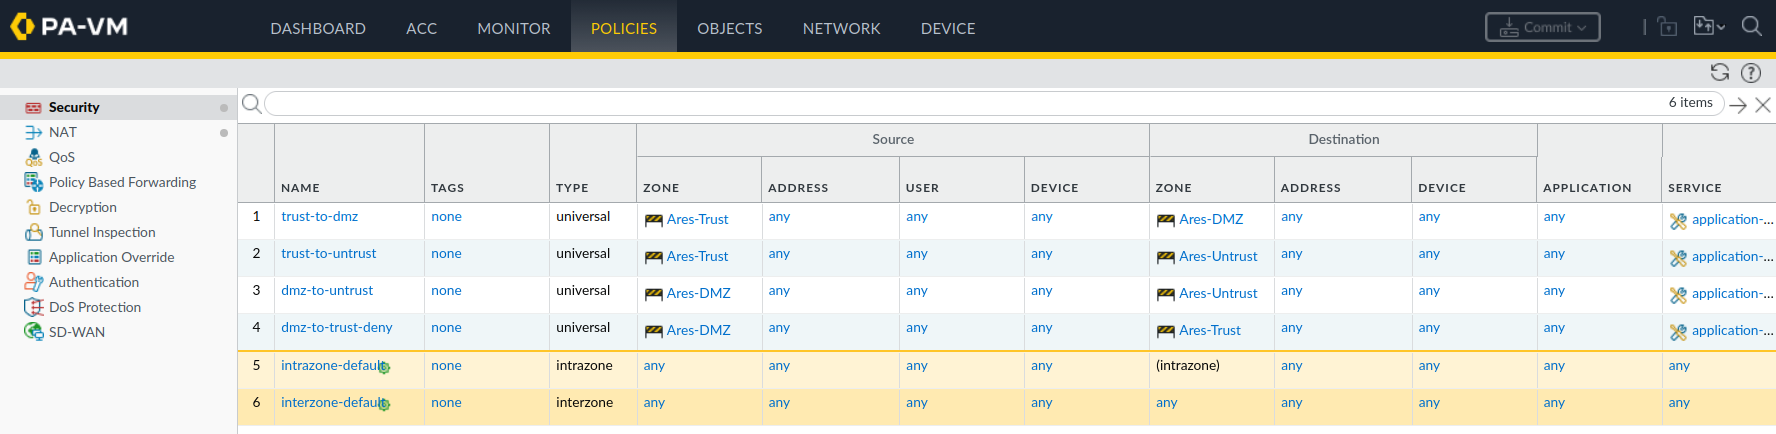
So basically the whole premise of this is to stop attackers from pivoting into the internal network and to give the users a form of least privilege. I made a table below to help break it down more instead of doing a deep dive into the rules. After all if you understand the goal it is much easier to make rules based off of it.
| # | Rule | Source | Dest | Action | Why |
|---|---|---|---|---|---|
| 1 | trust-to-dmz | trust | dmz | Allow | Internal users use the exposed servers (e.g. gitlab) |
| 2 | trust-to-untrust | trust | untrust | Allow | Internal users browse out |
| 3 | dmz-to-untrust | dmz | untrust | Allow | Servers reach out for updates |
| 4 | dmz-to-trust | dmz | trust | Deny | A compromised DMZ host can’t pivot inward |
I made three allows and one deny — and that one deny, Rule 4, is the reason the DMZ exists. Everything inbound from the internet (untrust → anything) is already covered by PAN-OS’s implicit deny-all at the bottom, so there’s no rule for it until you deliberately publish a service.
The one-way valve
Here’s the model the four rules add up to:
flowchart LR
  T["🛡️ Trust<br/>(internal)"]
  D["🌐 DMZ<br/>(exposed servers)"]
  U["☁️ Untrust<br/>(internet)"]
  T -->|"Rule 1 · allow"| D
  T -->|"Rule 2 · allow"| U
  D -->|"Rule 3 · allow"| U
  D -.->|"Rule 4 · DENY"| T
Because the firewall is stateful, allowing trust → DMZ automatically allows the return traffic for sessions your internal users start. Gitlab works completely normally: pages load, pushes go through, replies come back. What Rule 4 blocks is gitlab opening a new connection toward trust on its own initiative. That’s the exact move an attacker makes after compromising the gitlab machine — and it’s the move that turns a single compromised server into a network-wide breach.
Note what the DMZ does not do: it doesn’t restrict internet access. DMZ hosts still reach out freely (Rule 3). It restricts lateral movement, and only lateral movement. The question it answers is narrow and important: when the exposed server gets compromised, what can the attacker reach next? On a flat network, the answer is everything. Here, the answer stops at the DMZ wall. Unless that is the theory anyway. A highly skilled attacker can still do damage but this helps to lower the attack surface.
Simulating a Attacker
Now for the fun part. A deny rule that’s never been tested is just a hopeful comment in a config file, so I put on the attacker hat and tried to break out of the DMZ.
The scenario: assume an attacker has already compromised a public-facing server — SkyNet, sitting in my DMZ at 10.10.10.108. That’s a realistic starting point, because the DMZ is exactly where the exposed, most-likely-to-be-breached machines live. The attacker’s next move is always the same: figure out what else is on the network and pivot toward the valuable internal systems. So that’s what I simulated.
First, the baseline — proof the network actually works in the direction it’s supposed to. From a host in my trust zone (10.20.20.10), I pinged the DMZ server:
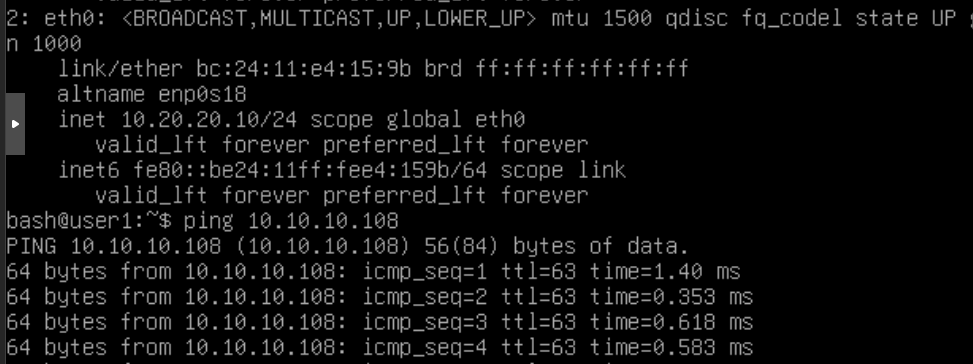
Clean replies, no loss. Internal users can reach the exposed server, exactly as Rule 1 intends. One detail I want to point out: the replies come back at TTL 63, one less than the usual 64. That single decrement means the packets crossed a router on the way — the firewall. The traffic isn’t flowing on a flat network; it’s being routed through the Palo Alto, which is the whole point.
Now the attacker’s move. From the compromised DMZ host, I tried to reach back into the trust network:
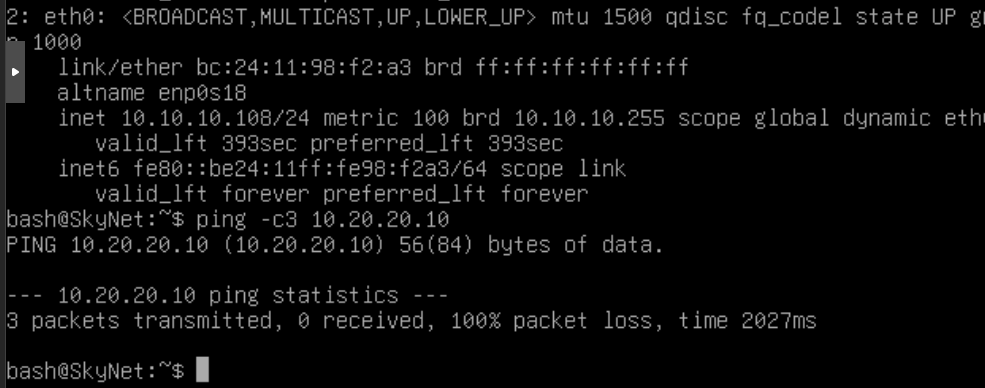
100% packet loss. Nothing comes back. Notice there’s no “host unreachable,” no rejection message — just silence. That’s a PAN-OS deny doing its job: it drops the packets without telling the sender anything. From the attacker’s seat on that compromised box, the internal network simply doesn’t exist. No reply is itself information the firewall refuses to give up.
A single blocked ping is fine, but a real attacker doesn’t ping once and give up — they scan. So I ran an nmap port sweep from the DMZ host against the trust target, the kind of reconnaissance that’s step one of any pivot, and watched it land in the firewall’s own traffic log.
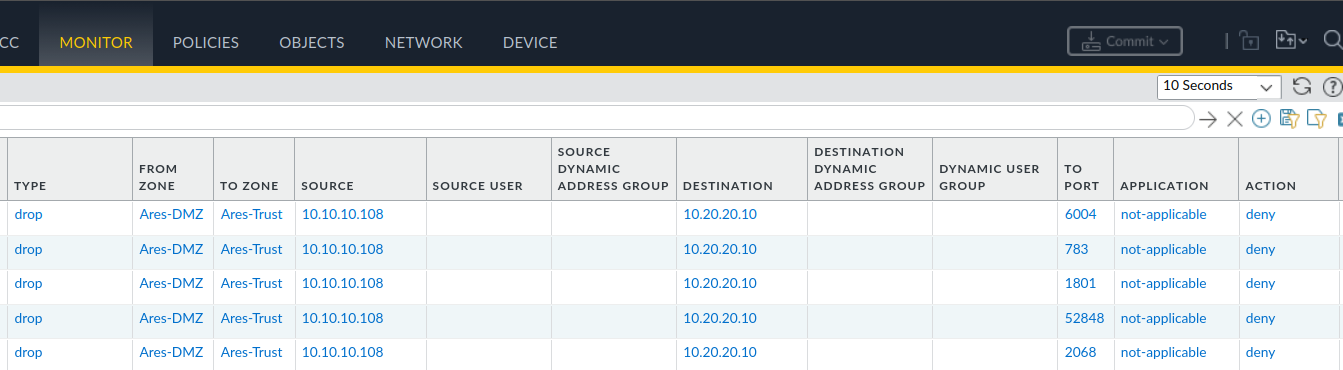
It shows the attacker traffic from the DMZ to the internal trust zone getting dropped which is what the goal was.